
Week 3 Card 1 Sumer
The Sumerians were an advanced civilization. Many of their stories are repeated in the bible. Noah’s flood for example, is almost identical to the account in the bible. Why do you think ancient writings talk about these events with just slight changes, such as the name of the people?
- Wrote about the Great Flood
- Invented the Wheel
- Trade Routes
- 9th Planet
- Planets Rotating Around the Sun
- Sixty second/Minute Clocks
- First Writing System
- First Contract
- Beer
- Sailboats
Older Students:
Week 3 Card 2 Methuselah
- Father was Enoch
- Name meant “His death shall bring”.
- Had Lamech, who had Noah.
- Life was the duration of God’s mercy
- When he died, the flood came
This is slightly creepy, but it explains the basics of Methuselah.
Week 3 Card 3 Noah’s Flood
Science: The Colors of the Rainbow
Supplies:
- Mortar and Pestle
- Salt
- Chalk
- Rainbow Sand
- Mirror
- Water
- Tins
- Clear Bowl
- Funnels
Instructions:
- Discuss rainbows with the class, use the video, or other resources to learn how rainbows form. The Bible talks about how rainbows are a promise from God that He will not flood the whole earth again, why is this important, and what is that story? The Noah’s ark video above discusses these points if further references are needed.
- Fill the clear plastic, or glass bowl with water. Find a spot in the classroom where the sunlight is the strongest.
- Place the mirror in the water to reflect the light onto a different surface. You may need to maneuver the bowl and mirror so that the the refraction of the light creates a rainbow, but it shouldn’t be necessary.
- Take out the plastic jars and multi colored sand.
- Each color of sand represents a color of the rainbow. Let the students pour the sand into their plastic jars in the order of the colors of the rainbow they just saw in the above project. It should go red, orange, yellow, green, blue, indigo and violet.
- Cap each plastic jar and write the name of the student on the bottom of the jar.
Art: Sumerian Cups
The Sumerian culture was extremely advanced. Discuss with your class some of the Sumerian innovations, such as farming using oxen and plows, the calendar, writing, and the wheel. How did these affect the people?
Next, discuss the importance of music. Do different cultures have different types of music? Listen with your class to some of the Sumerian Silver Lyre music below. Ask them to shut their eyes and imagine being in Sumer and hearing the same music.
Supplies:
- Eden Hope Academy Worksheet
- Metal Foil
- Plastic Cups
- String
- Scissors
- Glue
Instructions:
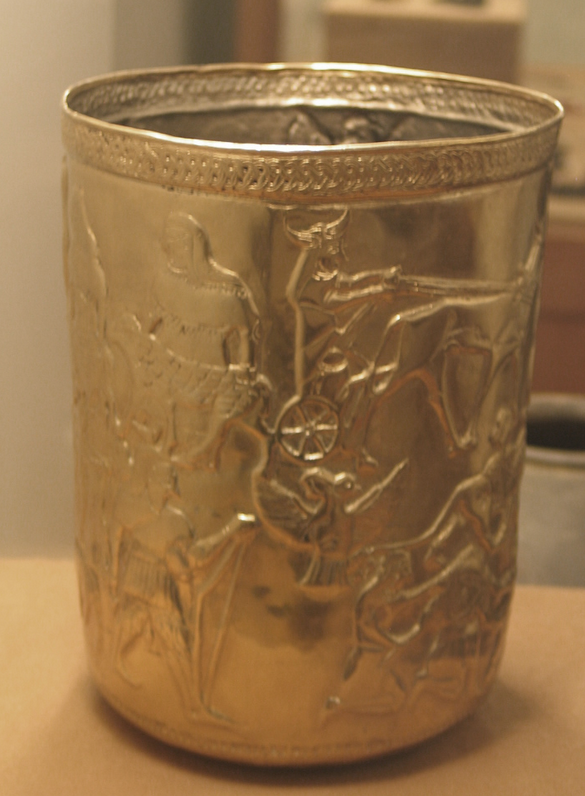
- Discuss the achievements of the Sumerians. Their accomplishments were very advanced, how did these accomplishments inspire other civilizations? Their metal work was also advanced. They created beautiful carved cups made of gold and other precious materials.
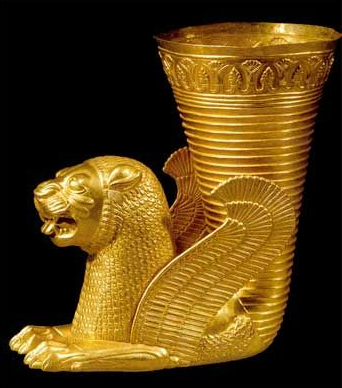
- Distribute the pictures of Sumerian cups and discuss the designs and intricacies of the craftsmanship. Were these throw away mugs? Who would have sipped from these cups?
 Distribute paper, yarn, glue, and foil.
- Students should cut Sumerian-ish designs out of the paper and glue it on the cup. It usually takes several layers to create the relief so they may wish to copy their design and glue them on top of each other.
- Younger students are welcome to cut out random designs. Explain that they only need a little glue so the pictures do not slip.
- The string, dipped in glue has a nice affect too.
- Once the designs are glued to the outside of the cups, students may stat applying foil on top. This may be messy and the foil may come apart. That is ok! Students are using a new medium and we will repeat this activity in a different form later in the year.


- Once they have their design in mind, they can use the string and glue to attach their work to the outside of the clear plastic cup.
- Cover the string designs in foil, let the students carefully press around the strings outline to give their work definition. If they press too hard, it might tear, so caution them to be gentle with their cups.
- Add their names to the bottom of the cup and place them somewhere where they can dry.
